前言
最近开发中需要使用到多个PHP版本,固采用容器化的方式运行PHP环境来开发PHP。为了能够进行断点单步调试,需要让IntelliJ IDEA / PhpStorm访问到PHP容器中运行的Xdebug服务。而这个过程有一些坑,为了避免再次爬坑,决定总结下。
Dockerfile文件修改
首先,我们需要在PHP容器中安装并激活xdebug。在镜像FROM php:7.4-fpm-alpine中使用pecl安装并启用之后,将配置一些xdebug的属性存放入php.ini中,这一部分的Dockerfile内容参考:
# Install xdebug extensions
RUN pecl install xdebug

# Enable xdebug extensions
RUN docker-php-ext-enable  xdebug

#xdebug configure
RUN echo 'xdebug.remote_port=9000' >> /usr/local/etc/php/php.ini
RUN echo 'xdebug.remote_enable=1' >> /usr/local/etc/php/php.ini这里使用的是9000端口是xdebug和PhpStorm默认使用的端口号。
不使用xdebug.remote_connect_back=1
如若启用此参数,xdebug会根据请求容器的源$_SERVER['REMOTE_ADDR']来返回数据,而这个IP地址段是随机的,不可穿透的,xdebug.log如下:
[17] Log opened at 2020-09-12 06:35:10
[17] I: Checking remote connect back address.
[17] I: Checking header 'HTTP_X_FORWARDED_FOR'.
[17] I: Checking header 'REMOTE_ADDR'.
[17] I: Remote address found, connecting to 172.29.0.1:9000.
[17] W: Creating socket for '172.29.0.1:9000', poll success, but error: Operation in progress (29).
[17] E: Could not connect to client. :-(
[17] Log closed at 2020-09-12 06:35:10
docker-compose.yml 文件
通过使用环境变量XDEBUG_CONFIG为xdebug.remote_host设置宿主机的IP地址实现传递数据。
macOS可以使用docker.for.mac.host.internal在容器内解析宿主机IP(好像是1.18提供的特性)。如果是linux主机可以使用docker.host.internal。
DNS name docker.for.mac.host.internal should be used instead of docker.for.mac.localhost (still valid) for host resolution from containers, since since there is an RFC banning the use of subdomains of localhost. See https://tools.ietf.org/html/draft-west-let-localhost-be-localhost-06.
尽量不要用docker.for.mac.localhost,过时了
version: "3.8"

services:
  web:
    build: .
    ports:
      - "8088:8088"
    container_name: php
    environment:
      XDEBUG_CONFIG: "remote_host=docker.for.mac.host.internal  remote_port=9000 idekey=PHPSTORM remote_log=/var/www/xdebug.log"
    volumes:
- "../src:/var/www"由于我使用的后端程序需要暴露端口为8088,切勿完全照抄,可按照自己的实际情况做出设定。
建议设置remote_log将日志输出在程序目录下,方便随时查看。
启动容器
#编译Dockerfile获得镜像
docker-compose build
#运行容器
docker-compose up -d
#运行程序
docker-compose exec web php artisan serve --port 8088 --host 0.0.0.0打开浏览器访问http://localhost:8088,此时WEB服务已经running。
到这一步,容器方面的操作已经结束,接下来说说PhpStorm的操作。
PhpStorm配置
我使用的PhpStorm版本为2020.1.1。
创建服务
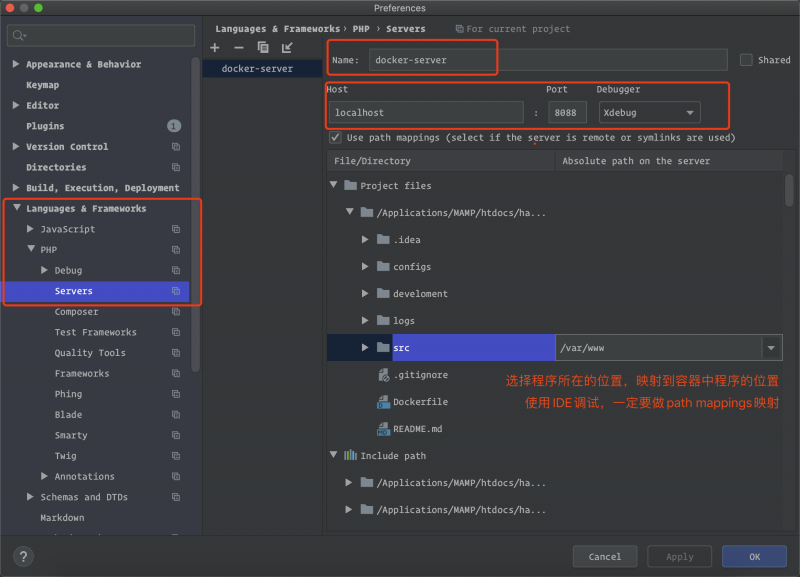
按cmd+`打开「Preferences」窗口,找到PHP->Servers,创建Servers。

Name:随意就好。Host:我使用的Docker network drive是默认的brige,因此这里我直接使用localhost可以访问到。Port:输入容器中映射给宿主机使用的端口,参见docker-compose.yml中的ports,我设置为8088。如果你设置的是8000:80,那么宿主机访问容器服务的端口就是8000,此处设置为8000。path mappings:在File/Directory列中,选择宿主机本地程序所在的位置,在Absolute path on the server列中,输入容器中程序的位置。
创建PHP调试类型的运行配置
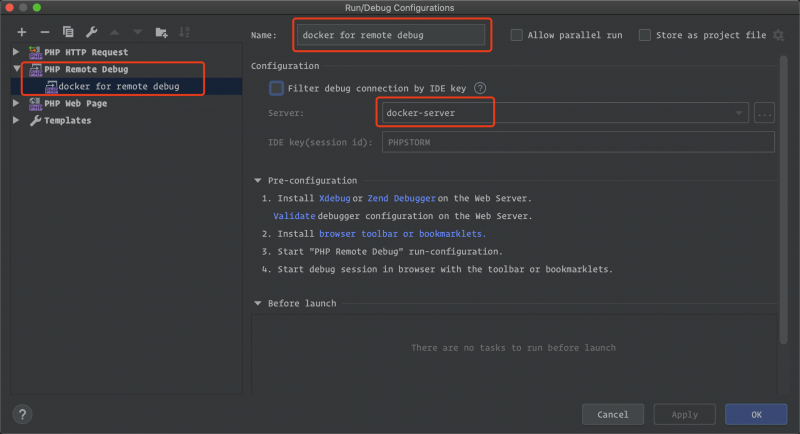
在菜单栏点击Run->Edit Configurations...,创建一个PHP remote Debug类型的调试配置,该配置通过remote xdebug服务器连接到PHP容器。

开始愉快的调试吧~


发表回复